Entry & Exit Triggers
Learn how professional traders time entries and exits using confirmation, confluence and risk management.

Entry & Exit Triggers
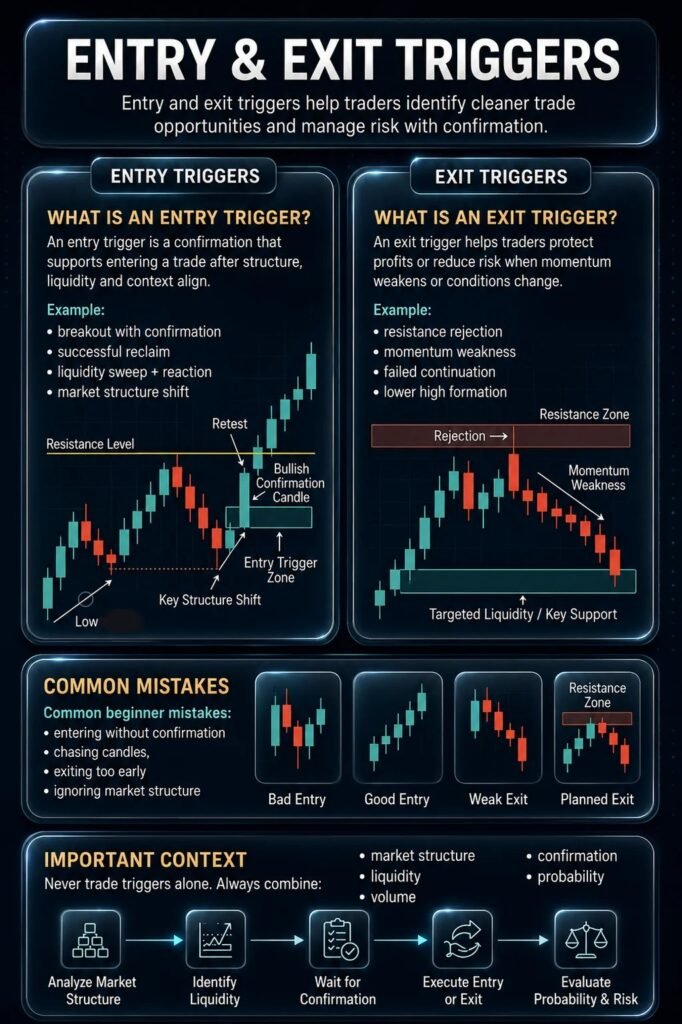
- Wait for confirmation before entering
- Trade with structure and liquidity
- Never force weak setups
- Protect risk before chasing reward
Professional entries and exits are never random. Strong trades happen when structure, liquidity and confirmation align.
A trigger acts as the green light for execution.
Common Entry Triggers
Good entries often happen after confirmation appears.
- Break of Structure (BOS) confirms trend direction
- CHoCH shows momentum may be shifting
- Retest of key level offers safer confirmation
- Rejection wick or SFP shows liquidity was taken
- Order Block or FVG touch improves precision
One trigger can work. Multiple triggers often improve probability.
Wait For Confluence
Before entering, check if multiple signals align.
- Structure direction (HH/HL or LH/LL)
- Liquidity sweep or important level
- Candle confirmation (close, wick or engulfing)
- Market context (trend or range)
No confluence often means no trade.
Common Exit Triggers
Professional traders also follow exit rules.
- Opposite liquidity sweep appears
- Structure breaks against the trade
- Major Order Block or FVG gets tapped
- Strong rejection wick forms
- Take profit reaches liquidity targets
Exits should follow rules, not emotions.
Common Mistakes
- Entering before candle confirmation
- Guessing breakouts
- Buying highs or selling lows emotionally
- Trading without a clear trigger
Patience often creates cleaner entries.
Quick Recap
- BOS and CHoCH provide directional clues
- Retests often create safer entries
- Confluence improves confidence
- Exits should follow structure
- No confirmation means no execution
- Strong entries happen when structure, liquidity and confirmation align.
Risk Reward Formula:
Reward ÷ Risk = RR
Example:
Take Profit = $300
Stop Loss = $100
$300 ÷ $100 = 3R
How to read it:
- 3:1 (3R) = strong setup
- 2:1 (2R) = good setup
- Below 1:1 = weaker risk profile
Why it matters:
Higher reward compared to risk improves long-term consistency.
Lower reward setups usually require a much higher win rate.
The Math Magic:
- 3:1 R:R only needs around 26% win rate to break even
- 1:1 R:R requires more than 50% win rate to stay profitable
Risk reward acts as a safety net over many trades.
The Profit Protector:
Once price reaches a 1:1 or 1:2 realization, many traders move stop loss to Break-Even.
This protects capital and removes downside risk from the position.
TradingView Cheat Sheet:
You do not need to calculate risk reward manually.
The Long Position and Short Position tools automatically show your R:R ratio on the chart.
The Gravity Trap:
Never widen stop loss during a losing trade.
Changing stop loss destroys your planned risk and often creates larger losses.
Golden Rule:
A high R:R means nothing without a quality setup. First find strong market structure and confirmation, then evaluate risk reward.